How To Adapt Electronics for the Visually Impaired


Modern electronics are wonderful! A cell phone, for instance, adds connection - and safety. Help is just a button away.
A cellphone can be especially valuable to shut-ins and the elderly. Check in with family (or 911!) at the click of a button or the swipe of a touchscreen... BUT ONLY IF they can see and manipulate that button or touchscreen.
Wonderful gizmos don't always work for the users who need them most.
Look closely at your own cell phone, your CD or DVD player, or your any-other-electronic-marvel.... Are there teeny tiny little buttons? Hard to see, hard to manipulate controls? Impossibly tiny print and labels? Stubborn battery compartments? Is the gizmo of such sleek, slick, black plastic design that you can't even SEE any controls? Now imagine if your eyesight was poorer or your hand was shaky. (And we're only talking about the mechanical aspect of problematic electronics here; we won't even get into topics like websites so poorly designed that the "delete" button sits right next to the "save" button. Yeesh.)
Recently I had an older relative visit. Seeing them in daily life and for days in a row, I discovered that there were all sorts of simple push-a-button tasks that their eyesight and faltering hand coordination made difficult.
A few enlightened companies HAVE realized that there is a problem (and a market!) and are starting to provide electronics geared to less-abled users. Like the "Jitterbug" phone my relative swears by. (Big, Easy. And with Great BIG Buttons.) But most manufacturers are clueless.
My relative, being independent-minded, struggled and generally succeeded against unhelpful product design... but why should listening to an audio book be such a struggle?
Being a designer, I tried to find ways to change the world - just a little - to make things easier.
Here is one of our solutions - an easy-peasy home-made retrofit to electronics for the vision impaired.
A NOTE: This lens was recently chosen as Lens of the Day. Thank you!
Time required: 1/2 hour
Difficulty: easy
Cost: $2-10
Materials:
- Consumer Electronics etc.
- "Puffy" Paint
- Colored Electrical or Other Tape
Tools:
- None
Instructions:
1. CHOOSE WISELY:
When shopping for consumer electronics and tech products (or any other kind), look first for the best available design to suit the user's needs. If this item is for someone visually impaired, for instance, look for high contrast between, say, controls and casing. If the gizmo is white and the "On" button is black, it'll be easier to find than the usual black-on-black electronics color scheme. Can you easily feel the controls? As eyesight dims, the physical feel of a gadget gets more important. Generally, you want the biggest buttons you can find - and ones with a positive "click" as they're pressed. Many touchscreens can be problematic or impossible for the sight impaired. If a touchscreen is the only way, would a stylus work better for the user than a fingertip? Also consider the item's weight and ease of handling and its sturdiness and stability, to make sure it's neither to clunky for its perhaps frail user, nor too dainty to stand up to perhaps clumsy manipulation.
2. ADD MARKINGS:
After you find the best (i.e. most user-friendly and user-proof) version of the tech... Look over it carefully. What controls are basic to its operation? Highlight those with a dot of puff paint (bright to see, raised to feel) or a stripe of color-coded tape. Colored tape also makes a great marker to keep various cords straight: color-code the power cord with a different color from the headphone wire or other cable. Nice bright! colors.
(The same strategy works to distinguish pill bottles too.)
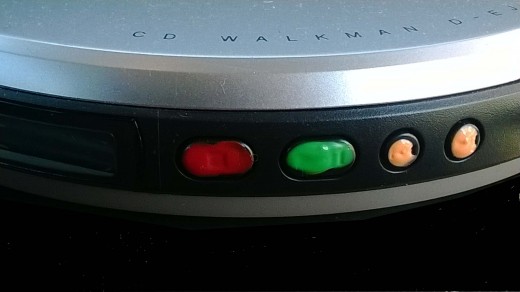
On this inexpensive CD player, for instance, all the controls were tiny little black buttons - on a black case. They were nearly impossible to find with fingers alone, hard to find with good eyesight, and too similar in size or shape... but they did have tiny tiny minescule labeling. Real helpful!
Four dots of puff paint made these impossible controls friendly: "ON" became green for GO, "Off" got stop-sign red paint, and "forward/backward" got dabs of yellow paint because that contrasted well with that black background. (Luckily the player's designer at least put the "forward" on the right-hand side of "backward" which worked intuitively.)
Another very helpful place to dab a little paint is on the plug and receptacle of the charger. EVERYONE has a hard time getting that mini plug turned the right way - small side to small side. Two dabs of puff paint will let you plug in your phone etc. even in the dark, just by feel. Plugging in the phone used to take up to 15 minutes for my relative... after paint it takes one try.


There are a couple other Squidoo lenses that have some suggestions you may find helpful: How do you do ___ "blind"? My story and Top 5 Low Vision Products,
What problems or fixes have you discovered?


